Targeting your push notifications
Overview
In this guide, you will learn how to target your notifications to specific audiences using OneSignal tags. You will create a sample application and randomly add 50% of all users to the "Pro" group, and then push notifications only to members of this group.
Pre-requisites
Here are some things you should know before you can get started with this guide.
- Setting up OneSignal in your app
Info
Take a look at our Community-made guide on setting up Push Notifications for your app here.
First steps
Head over to your OneSignal Dashboard to set up a new "tag". Tags can be used to identify specific users by their value. In this example, we will be creating a tag called "pro".

Navigate to the "Audience" section using the tabs at the top of the page.

Click on "New Segment" to create a group of users. The Segment's name will be the tag which we will pass from the app's blocks.

Rename the Segment to "Pro" and click on "Create Segment".
Your OneSignal app is now ready to handle users with the "Pro" tag!
Designing the app
As usual, we'll start with a new project. All we will need for this guide is the Push Notifications component in the Social category. Ensure you're using the correct OneSignal App ID for your app.
This is what the designer should look like (not much to see...)

Coding the blocks
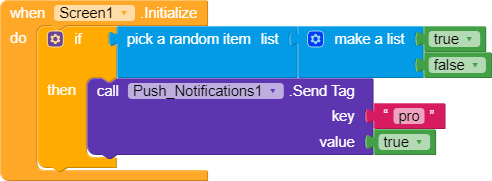
We will be using only nine blocks in this guide. When the screen is opened, we pick True or False at random and if True, we send the 'pro' tag to OneSignal.
Info
OneSignal tags are case insensitive, so pro and Pro are the same tag!
Sending targeted notifications
In the "Messages" section of your OneSignal Dashboard, click on "New Push" to create a new notification.

Change the "Audience" setting to "Send to Particular Segments".

Remove the default "Subscribed Users" segment and use the "Add Segment" button to add the "Pro" segment.

Fill up the rest of the notification details as usual, and "Confirm" your push notification. That's it! Only "Pro" users will see the notification you just sent.
Conclusion
Congratulations! You've successfully targeted your push notifications to specific users!
Here is a summary of what you've learned in this guide.
- How to create OneSignal Segments.
- How to add users to specific Segments using tags.
- How to send notifications to users of certain Segments.
Next steps
Want ideas for making this app better? We have some things for you to try.
- Create more Segments and add users to multiple Segments.
- Send Push Notifications to multiple Segments at once.
- Remove users from a particular Segment using the
Delete Tagblock in thePush Notificationscomponent.
Downloads
Get the APK file here.